The Quest for Crunch: Mastering Perfectly Crispy Lamb Keema Papadum
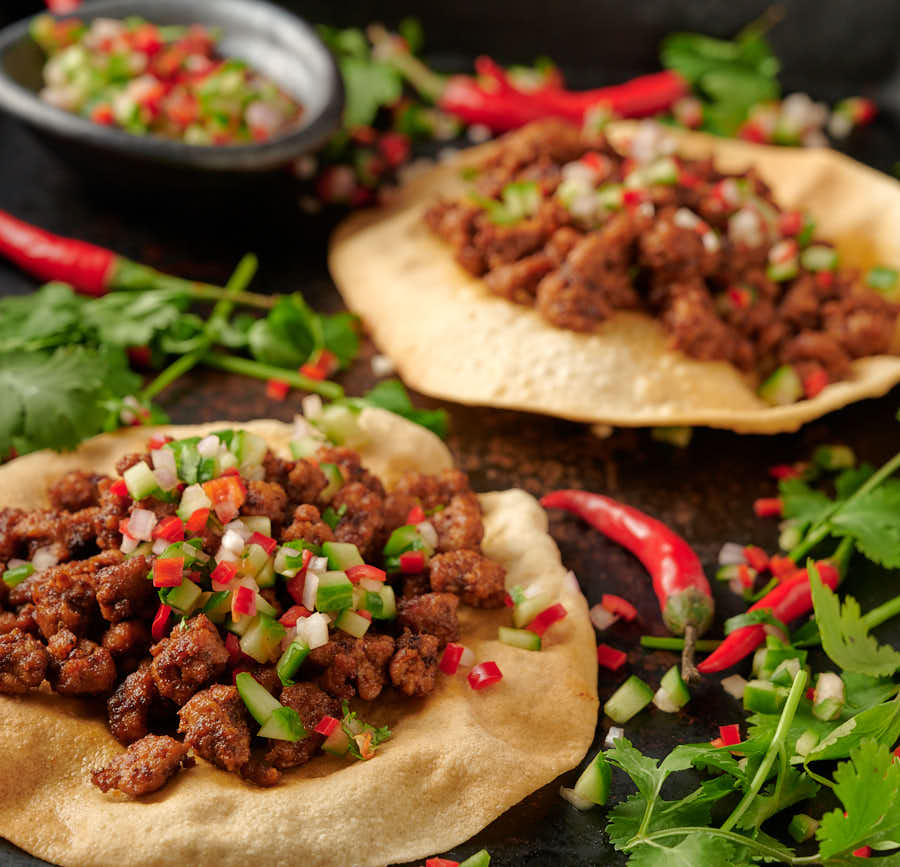
There's a special kind of magic in a dish where textures collide in perfect harmony. When it comes to Indian appetizers, few experiences rival the delight of a perfectly crispy lamb keema papadum. The rich, savory, and subtly spiced minced lamb (keema) nestled atop a light, airy, and utterly crunchy papadum wafer is a symphony for the senses. Yet, achieving that ideal crispiness can sometimes feel like a culinary tightrope walk. Too often, the papadum succumbs to the moisture of the keema, transforming a potentially glorious snack into a soggy disappointment. Fear not, fellow food enthusiasts! This comprehensive guide will arm you with all the tips, tricks, and techniques you need to ensure every bite of your lamb keema papadum delivers that satisfying, unmistakable crunch. We'll delve into everything from ingredient selection and cooking methods to assembly and serving strategies, guaranteeing your next batch is a resounding success.The Foundation of Crunch: Understanding Your Papadum
The papadum itself is the backbone of our crispy creation. These thin, lentil or rice-based wafers are designed for crispiness, but their delicate nature means they can also be their own worst enemy when exposed to moisture. Mastering the art of cooking the papadum is the first crucial step.Choosing the Right Papadum
- Type Matters: While various papadums exist, traditional lentil-based papadums (like Urad Dal) tend to offer the best balance of crispiness and flavor absorption for lamb keema papadum. They're thin, light, and puff up beautifully when cooked.
- Freshness is Key: Stale papadums won't crisp up as well and might taste cardboard-like. Always check the expiry date and ensure they've been stored in an airtight container to prevent moisture absorption.
- Thinness: Thinner papadums generally become crispier and more delicate. Look for brands that offer uniformly thin wafers.
Perfecting Papadum Cooking Methods
Different methods yield slightly different textures. Choose the one that suits your preference and equipment.
- Deep Frying (The Classic): This method provides the most consistent and often the crispest result.
- Heat enough oil (vegetable or canola) in a pan or wok to about 350-375°F (175-190°C).
- Carefully slide one papadum into the hot oil. It will instantly puff up.
- Using tongs, flip it quickly (it cooks in mere seconds!).
- Remove immediately once it's golden brown and fully expanded. Don't let it overcook, or it will taste bitter.
- Drain on paper towels to remove excess oil.
- Microwaving (The Quick & Healthy Option): Excellent for a virtually oil-free papadum.
- Place one papadum on a microwave-safe plate.
- Microwave on high for 30-60 seconds. Cooking time varies greatly by microwave, so watch it closely! It will start to curl and crisp.
- Remove once fully cooked and crispy. If it's still pliable, microwave for a few more seconds.
- Air Frying (The Modern Twist): A fantastic alternative for a healthy crunch.
- Preheat your air fryer to 350-375°F (175-190°C).
- Place one or two papadums in a single layer in the air fryer basket (do not overlap).
- Air fry for 1-2 minutes, flipping halfway through. Keep a close eye on them as they can burn quickly.
- They should be light, puffed, and crispy.
- Grilling/Open Flame (The Traditional Way): Adds a lovely smoky flavor.
- Hold the papadum with tongs directly over a medium gas flame or hot griddle (tawa).
- Move it constantly, turning it often, until it puffs up and develops a few dark spots.
- This method requires practice to prevent burning.
Pro Tip: Regardless of the method, cook papadums just before serving. Even a few minutes can lead to moisture absorption from the air, compromising their crispness.
Crafting the Perfect Keema: Moisture Control is Key
While the papadum provides the crunch, the lamb keema delivers the flavor. The secret to a non-soggy papadum lies heavily in how you prepare your keema. Excessive moisture in the keema is the arch-nemesis of crispiness.Drying Out Your Keema: The Golden Rule
The biggest mistake is a wet, saucy keema. Your lamb mince needs to be cooked down until it's relatively dry, yet still flavorful and tender. Think crumbly, not runny.
- Sear and Drain: Start by browning your lamb mince thoroughly in a hot pan. If the lamb releases a lot of water, drain off any excess liquid before adding other ingredients. This step is critical.
- Cook Down the Moisture: After adding onions, ginger, garlic, and spices, let the keema simmer gently without a lid for a good amount of time. This allows the liquids to evaporate. Stir occasionally to prevent sticking.
- Resist the Sauce: While some moisture is inevitable, avoid making your keema too "saucy" with a lot of tomatoes or yogurt. For lamb keema papadum, a drier, more concentrated flavor profile works best. If using tomatoes, cook them down until the oil separates and the mixture is thick.
- Cool Before Assembly: Once your keema is cooked, let it cool completely. Warm keema will produce steam, which will instantly soften the papadum. Ideally, make the keema ahead of time and chill it.
Texture and Flavor Profile of the Keema
- Fine Mince: A finer lamb mince works better than chunky pieces, as it sits more evenly on the papadum and distributes flavor without adding bulk.
- Bold but Balanced Spices: Since the keema will be spread thinly, ensure your spices are vibrant. Cumin, coriander, turmeric, garam masala, and a touch of chili are excellent choices. Balance them to create a rich, savory profile that stands up to the crisp papadum. For a deeper dive into the preparation, check out our guide on Authentic Lamb Keema Papadum: A Step-by-Step Guide.
- A Touch of Acidity: A squeeze of fresh lemon juice or a sprinkle of dried mango powder (amchur) at the end brightens the keema's flavor without adding significant moisture.
The Art of Assembly and Immediate Enjoyment
Even if your papadums are perfectly crispy and your keema is impeccably dry, poor assembly or delayed serving can still lead to a soggy disaster. This final stage is all about timing and technique.Timing is Everything
The cardinal rule of crispy lamb keema papadum is simple: assemble just before serving. This cannot be stressed enough. As soon as the keema touches the papadum, the clock starts ticking on its crispiness.
- Prep Ahead: Have all your components ready. Keema cooled, papadums cooked and drained, garnishes chopped.
- Set Up an Assembly Line: If making a large batch, arrange your cooked papadums on a platter, have the keema ready, and the garnishes at hand.
- Serve Immediately: Once assembled, these treats are best enjoyed within minutes. Encourage guests to grab them as soon as they're ready.
Assembly Techniques for Maximum Crunch
- The Gentle Scoop: Use a spoon to gently place a small, manageable amount of keema onto the center of each papadum. Avoid piling it too high.
- Edge Control: Try to keep the keema away from the very edges of the papadum. This preserves more of the clean, crisp wafer for easier handling and ensures less contact with potential moisture.
- Garnish for Freshness: A sprinkle of finely chopped fresh cilantro, a few pomegranate seeds, or a tiny dice of red onion can add freshness, color, and another layer of texture without adding excessive moisture.
Remember, the goal is a bite that combines the intense flavor of the keema with the satisfying shatter of the papadum. For more reasons why this dish is a must-try, take a look at Lamb Keema Papadum: Why It's Your Next Favorite Snack.
Troubleshooting Common Crispy Papadum Pitfalls
Even with the best intentions, things can go wrong. Here's how to identify and avoid common problems:Problem: My Papadum is Soggy!
- Culprit: Usually wet keema or delayed serving.
- Solution: Ensure keema is cooked down until dry. Let keema cool completely. Assemble immediately before serving. Cook papadums just before assembly.
Problem: My Papadum is Greasy!
- Culprit: Oil temperature too low, or insufficient draining.
- Solution: Ensure frying oil is at the correct temperature (350-375°F). Drain papadums thoroughly on paper towels immediately after frying. For an oil-free option, use the microwave or air fryer.
Problem: My Papadum is Burnt/Bitter!
- Culprit: Overcooking or oil too hot.
- Solution: Papadums cook very quickly! Watch them constantly. Adjust oil temperature down slightly if they're browning too fast. Remove as soon as they're puffed and lightly golden.
Problem: Keema Slips Off the Papadum!
- Culprit: Too much keema or papadum is too flat.
- Solution: Use less keema per papadum. If desired, you can gently curve the cooked papadum slightly (while still warm and pliable) to create a subtle "cup" shape to hold the keema better, but be careful not to break it.
